Arclin

Advocate Technology. Enjoy Technology.

0%

iOS 底层原理 --- 方法、消息发送与super关键字

本文主要简述类(元类)对象里面的方法缓存、消息发送(包括消息发送,动态方法解析与消息转发)与super关键字的底层原理

方法

Class对象的结构

1
2
3
4
5
6
struct objc_class {
Class isa;
Class superclass;
cache_t cache; // 方法缓存
class_data_bits_t bits; // 用于获取具体的类信息
}

其中bits成员变量与FAST_DATA_MASK进行一次与运算之后,会获得一个其属性可读可写的对象的地址,这个对象长这样

1
2
3
4
5
6
7
8
9
10
11
struct class_rw_t {
uint32_t flags;
uint32_t version;
const clsss_ro_t *ro;
method_array_t * methods; // 方法列表
property_array_t *properties; // 属性列表
protocol_array_t protocols; // 协议列表
Class firstSubclass;
Class nextSiblingClass;
char *demangledName;
}

其中 class_ro_t里面存放的是类的原始信息(不包括分类里面的东西),是仅可读的,结构如下

1
2
3
4
5
6
7
8
9
10
11
12
13
14
15
struct class_ro_t {
uint32_t flags;
unit32_t instanceStart;
uint32_t instanceSize; // instance对象占用的内存空间
#ifdef __LP__64__
uint32_t reserved;
#endif
const uint8_t *ivarLayout;
const char * name; // 类名
method_list_t * baseMethodList;
protocol_list_t * baseProtocols;
const ivar_list_t * ivars; // 成员变量列表
const uint8_t * weakIverLayout;
property_list_t * baseProperties;
}

class_rw_t

class_rw_t里面的methods、properties、protocols是二维数组,是可读可写的,比如方法列表随时可以新增method_list_t类型的数据进去。class_rw_t包含了类的初始内容和分类的内容,其中方法列表类似如下结构

1
2
3
4
5
6
7
8
9
10
11
12
method_array_t: [
method_list_t : [
method_t,
method_t,
method_t
],
method_list_t : [
method_t,
method_t,
method_t
],
]

objc_class内有一个data()函数,其返回值一开始是指向class_ro_t类型的对象的。在合并分类内的内容时,才会产生class_rw_t类型的对象,并指向这个对象。可以参考runtime源码,objc-runtime-new.mmrealizeClassWithoutSwift函数的实现,这里贴出关键部分

1
2
3
4
5
6
7
8
9
10
11
12
13
14
15
16
17
18
19
20
static Class realizeClassWithoutSwift(Class cls, Class previously)
{
...
auto ro = (const class_ro_t *)cls->data();
auto isMeta = ro->flags & RO_META;
if (ro->flags & RO_FUTURE) {
// This was a future class. rw data is already allocated.
rw = cls->data();
ro = cls->data()->ro();
ASSERT(!isMeta);
cls->changeInfo(RW_REALIZED|RW_REALIZING, RW_FUTURE);
} else {
// Normal class. Allocate writeable class data.
rw = objc::zalloc<class_rw_t>();
rw->set_ro(ro);
rw->flags = RW_REALIZED|RW_REALIZING|isMeta;
cls->setData(rw);
}
...
}

class_ro_t

class_ro_t里面的baseMethodList、baseProtocols、ivars、baseProperties是一维数组,是只读的,所以不能新增内容,包含了类的初始内容,其中方法列表类似如下结构

1
2
3
4
5
method_list_t : [
method_t,
method_t,
method_t
]

在runtime源码,objc-runtime-new.mm中的attachCategories方法中我们可以看到分类合并到class_rw_t对象的过程,比如方法的合并如下

1
2
3
4
5
6
7
8
9
10
method_list_t *mlist = entry.cat->methodsForMeta(isMeta);
if (mlist) {
if (mcount == 64) {
prepareMethodLists(cls, mlists, mcount, NO, fromBundle, __func__);
rwe->methods.attachLists(mlists, mcount);
mcount = 0;
}
mlists[ATTACH_BUFSIZ - ++mcount] = mlist;
fromBundle |= entry.hi->isBundle();
}

method_t

  • method_t是对方法/函数的封装(下面是缩减版定义)
1
2
3
4
5
6
7
struct method_t {
...
SEL name(); // 函数名
const char *types(); // 编码(返回值类型、参数类型)
IMP imp(bool needsLock); // 指向函数的指针(函数地址)
...
}
  • IMP代表具体函数的实现

    typedef id _Nullable (*IMP)(id _Nonnull, SEL _Nonnull, ...);

  • SEL可以代表方法\函数名,一般叫做选择器,底层结构跟char *类似

    typedef struct objc_selector *SEL;

    • 可以通过@selector()sel_registerName()获得
    • 可以通过sel_getName()NSStringFromSelector()转成字符串
    • 不同类中相同名字的方法,所对应的方法选择器是相同的
  • types包含了函数返回值、参数编码的字符串,称作Type Encodings(类型编码),具体可以参考苹果官方文档

    • 比如-(void)test:(int)a;的方法编码为v@:i,v = void,@表示指针变量(因为编译后第一个参数是self),:表示选择器(因为编译后第二个参数是_cmd),
    • 有时类型编码会带上数字,比如v16@0:8,第一个数字表示这个函数的参数一共占用16个字节,第二个数字开始往后的数字都代表偏移值,0代表第一个参数的字节偏移值为0,第三个数字8代表偏移8个字节,也就是第一个参数已经占用了8个字节了,所以第二个参数就从第8个字节开始

cache_t

  • Class内部结构中有个方法缓存(cache_t),用散列表来缓存曾经调用过的方法,可以提高方法的查找速度
1
2
3
4
5
6
7
8
9
10
11
12
13
14
struct cache_t {
explicit_atomic<uintptr_t> _bucketsAndMaybeMask;
union {
struct {
explicit_atomic<mask_t> _maybeMask; // 散列表的长度 - 1
uint16_t _flags;
uint16_t _occupied; // 已经缓存的方法数量
};
explicit_atomic<preopt_cache_t *> _originalPreoptCache;
};
struct bucket_t *buckets() const;
mask_t mask() const;
mask_t occupied() const;
};

其中,通过buckets()函数我们可以得知_bucketsAndMaybeMask是一个存放bucket_t数组的指针(即_bucketsAndMaybeMask指针指向的是数组的第一个元素),是通过位运算取出来的

1
2
3
4
5
struct bucket_t *cache_t::buckets() const
{
uintptr_t addr = _bucketsAndMaybeMask.load(memory_order_relaxed);
return (bucket_t *)(addr & bucketsMask);
}

bucket_t的结构如下

1
2
3
4
struct bucket_t {
explicit_atomic<uintptr_t> _imp; // 函数的内存地址
explicit_atomic<SEL> _sel; // SEL作为key
};

通过IMP和SEL,我们就可以调用方法了,所以综上所述,一个实例对象调用方法,其类对象从方法缓存里面找方法的大概流程就是

1
2
获取sel : class - isa - 偏移16个字节 - cache_t - buckets() - [bucket_t] - 计算出下标index - bucket_t - sel()
获取imp : class - isa - 偏移16个字节 - cache_t - buckets() - [bucket_t] - 计算出下标index - bucket_t - imp(nil,cls)

另外_bucketsAndMaybeMask之所以叫这个名字是因为它不仅存放着buckets还存放着maybeMask,在arm64位真机环境下,取高16位,如下:

1
2
3
4
5
6
mask_t cache_t::mask() const
{
uintptr_t maskAndBuckets = _bucketsAndMaybeMask.load(memory_order_relaxed);
//maskShift 为48,
return maskAndBuckets >> maskShift;
}

方法缓存的流程

先看看runtime源码中,将方法插入缓存的函数(摘抄核心流程)

1
2
3
4
5
6
7
8
9
10
11
12
13
14
15
16
17
18
19
20
21
22
23
24
25
26
27
28
29
30
31
32
33
34
35
36
37
38
39
40
41
42
43
44
45
46
47
48
49
50
51
52
53
54
55
56
57
58
59
60
61
62
63
64
65
66
67
void cache_t::insert(SEL sel, IMP imp, id receiver)
{
...
//对_occupied赋值 + 1。首次 newOccupied = 1。
mask_t newOccupied = occupied() + 1;
//旧容量,(mask + 1) 或者 0
unsigned oldCapacity = capacity(), capacity = oldCapacity;
//是否为空,首次进入这里
if (slowpath(isConstantEmptyCache())) {
// Cache is read-only. Replace it.
//默认容量给4
if (!capacity) capacity = INIT_CACHE_SIZE;//1 << 2 = 4
//0 4 false 开辟新的容器空间。由于旧容器为空这里不需要释放传false。
reallocate(oldCapacity, capacity, /* freeOld */false);
}
//newOccupied + 1 (相当于 _occupied + 2) <= capacity * 3 / 4 容量够的时候什么都不做,直接插入。<=75%的容积正常插入,否则扩容。
//## ⚠️在arm64位的情况下,CACHE_END_MARKER 0 扩容条件为:7 / 8 87.5% 这个时候CACHE_ALLOW_FULL_UTILIZATION 为 1
else if (fastpath(newOccupied + CACHE_END_MARKER <= cache_fill_ratio(capacity))) {
// Cache is less than 3/4 or 7/8 full. Use it as-is.
}
#if CACHE_ALLOW_FULL_UTILIZATION
//capacity <= 1<<3 (8), _occupied + 1(CACHE_END_MARKER为0) <= 容量。少于8个元素的时候允许100%占满。
else if (capacity <= FULL_UTILIZATION_CACHE_SIZE && newOccupied + CACHE_END_MARKER <= capacity) {
// Allow 100% cache utilization for small buckets. Use it as-is.
}
#endif
//扩容
else {
//容量不为空返回 2倍的容量,否则返回4
capacity = capacity ? capacity * 2 : INIT_CACHE_SIZE;
//MAX_CACHE_SIZE 1<<16 = 2^16。最大缓存65536
if (capacity > MAX_CACHE_SIZE) {
capacity = MAX_CACHE_SIZE;
}
//开辟新的容器控件,释放旧的空间。
reallocate(oldCapacity, capacity, true);
}
//从_bucketsAndMaybeMask获取buckets
bucket_t *b = buckets();
mask_t m = capacity - 1;//首次是4-1
//计算插入的index
mask_t begin = cache_hash(sel, m);
mask_t i = begin;

// Scan for the first unused slot and insert there.
// There is guaranteed to be an empty slot.
//循环判断插入数据。
do {
//能走到这里大概率是cache不存在,所以这里走fastpath
if (fastpath(b[i].sel() == 0)) {
//Occupied + 1
incrementOccupied();
//buckets中插入bucket
b[i].set<Atomic, Encoded>(b, sel, imp, cls());
return;
}
//已经存在了,不进行任何处理。有可能是其它线程插入的。
if (b[i].sel() == sel) {
// The entry was added to the cache by some other thread
// before we grabbed the cacheUpdateLock.
return;
}
//cache_next为了防止hash冲突。再hash了一次(下文会讲到)。
} while (fastpath((i = cache_next(i, m)) != begin));
//异常处理
bad_cache(receiver, (SEL)sel);
}
  • 首次进入isConstantEmptyCache分支。会创建一个容量为4的空buckets。这个时候由于旧buckets不存在不需要释放所以参数传递false。
  • 当容量大于等于3/4或7/8的情况下扩容。arm64的条件下为7 / 8。
  • arm64条件下容量小于等于8的时候会占用100%才扩容。
  • 扩容是直接翻倍,默认值4。最大值MAX_CACHE_SIZE为216(65536)。在扩容的时候直接释放了旧值。
  • mask值为capacity - 1
  • 通过cache_hash(下文会提及的散列表算法)计算插入的index,后面会通过cache_next再进行计算hash解决冲突问题。
  • 循环判断通过b[i].set插入bucket数据。
  • reallocate函数在开辟控件的同时,把缓存给直接清空了,清空之后再把现在要缓存的方法放进去,所以扩容后occupied会为1。

散列表(哈希表)缓存

  • 方法缓存的容器,不是简单的数组,而是用散列表的方式进行存储。

    假如现在散列表长度为10,那么mask(即cache_t里面的_maybeMask)就是10-1 = 9,当selector传进来的时候,会跟mask进行一次与运算,如下:

    @selector(personTest) & mask = 4

    假如得到的结果是4的话,那么就会插在列表的下标为4的位置,其他位置因为已经开辟好空间了,所以有值就放值,没值就NULL

    这种列表的好处是,当想取到特定的bucket_t的时候,只需要把selector跟mask进行一次与运算,就可以直接得到下标,然后直接从列表取出,这样子就不用遍历查找了,大大节约了性能。

    另外,由于与运算的特性,跟mask进行与运算之后的值,都不可能比mask更大,这样子就保证不会插入越界的位置。

  • 如果通过计算后的下标值,插入列表的时候发现已经有东西了那怎么办?

    这也就是所谓的Hash冲突。为了处理这种问题,系统会调用cache_next函数

    1
    2
    3
    static inline mask_t cache_next(mask_t i, mask_t mask) {
    return i ? i-1 : mask;
    }

    也就是说如果@selector(personTest) & mask = 4的4已经有东西了,那么就取 4 - 1 = 3,如果3还有东西,就放在2的位置,如果2还有,就放在1,以此类推,如果直到0都还没有可以插入的位置,那么就从mask的位置开始找,也就是9,然后再找9看看是否可以插入,插不进去再找8,以此类推,找到为止。

    由于列表在存放数量达到容量的87.5%的时候就会两倍的扩容(arm64),扩容后又会清空缓存,所以一定能找到合适的位置插入的。

消息发送机制

调用一个不存在的方法的时候,他会经历这么一个流程

消息发送 - (找不到方法的话) -> 动态方法解析 - (没有实现的话) -> 消息转发 -> (没有实现的话) -> 抛出异常

消息发送

假如我们这么调用一个方法

1
[person personTest];

底层会转换为

1
objc_msgSend(person,sel_registerName("personTest"));
  • 这里的person我们称作消息接受者(receiver),就是调用方法的对象,如果这里还是调用类方法的话,那么这里就会传入一个类对象
  • sel_registerName()函数等价于@selector
  • 为了性能,objc_msgSend方法底层是使用汇编和C++实现的
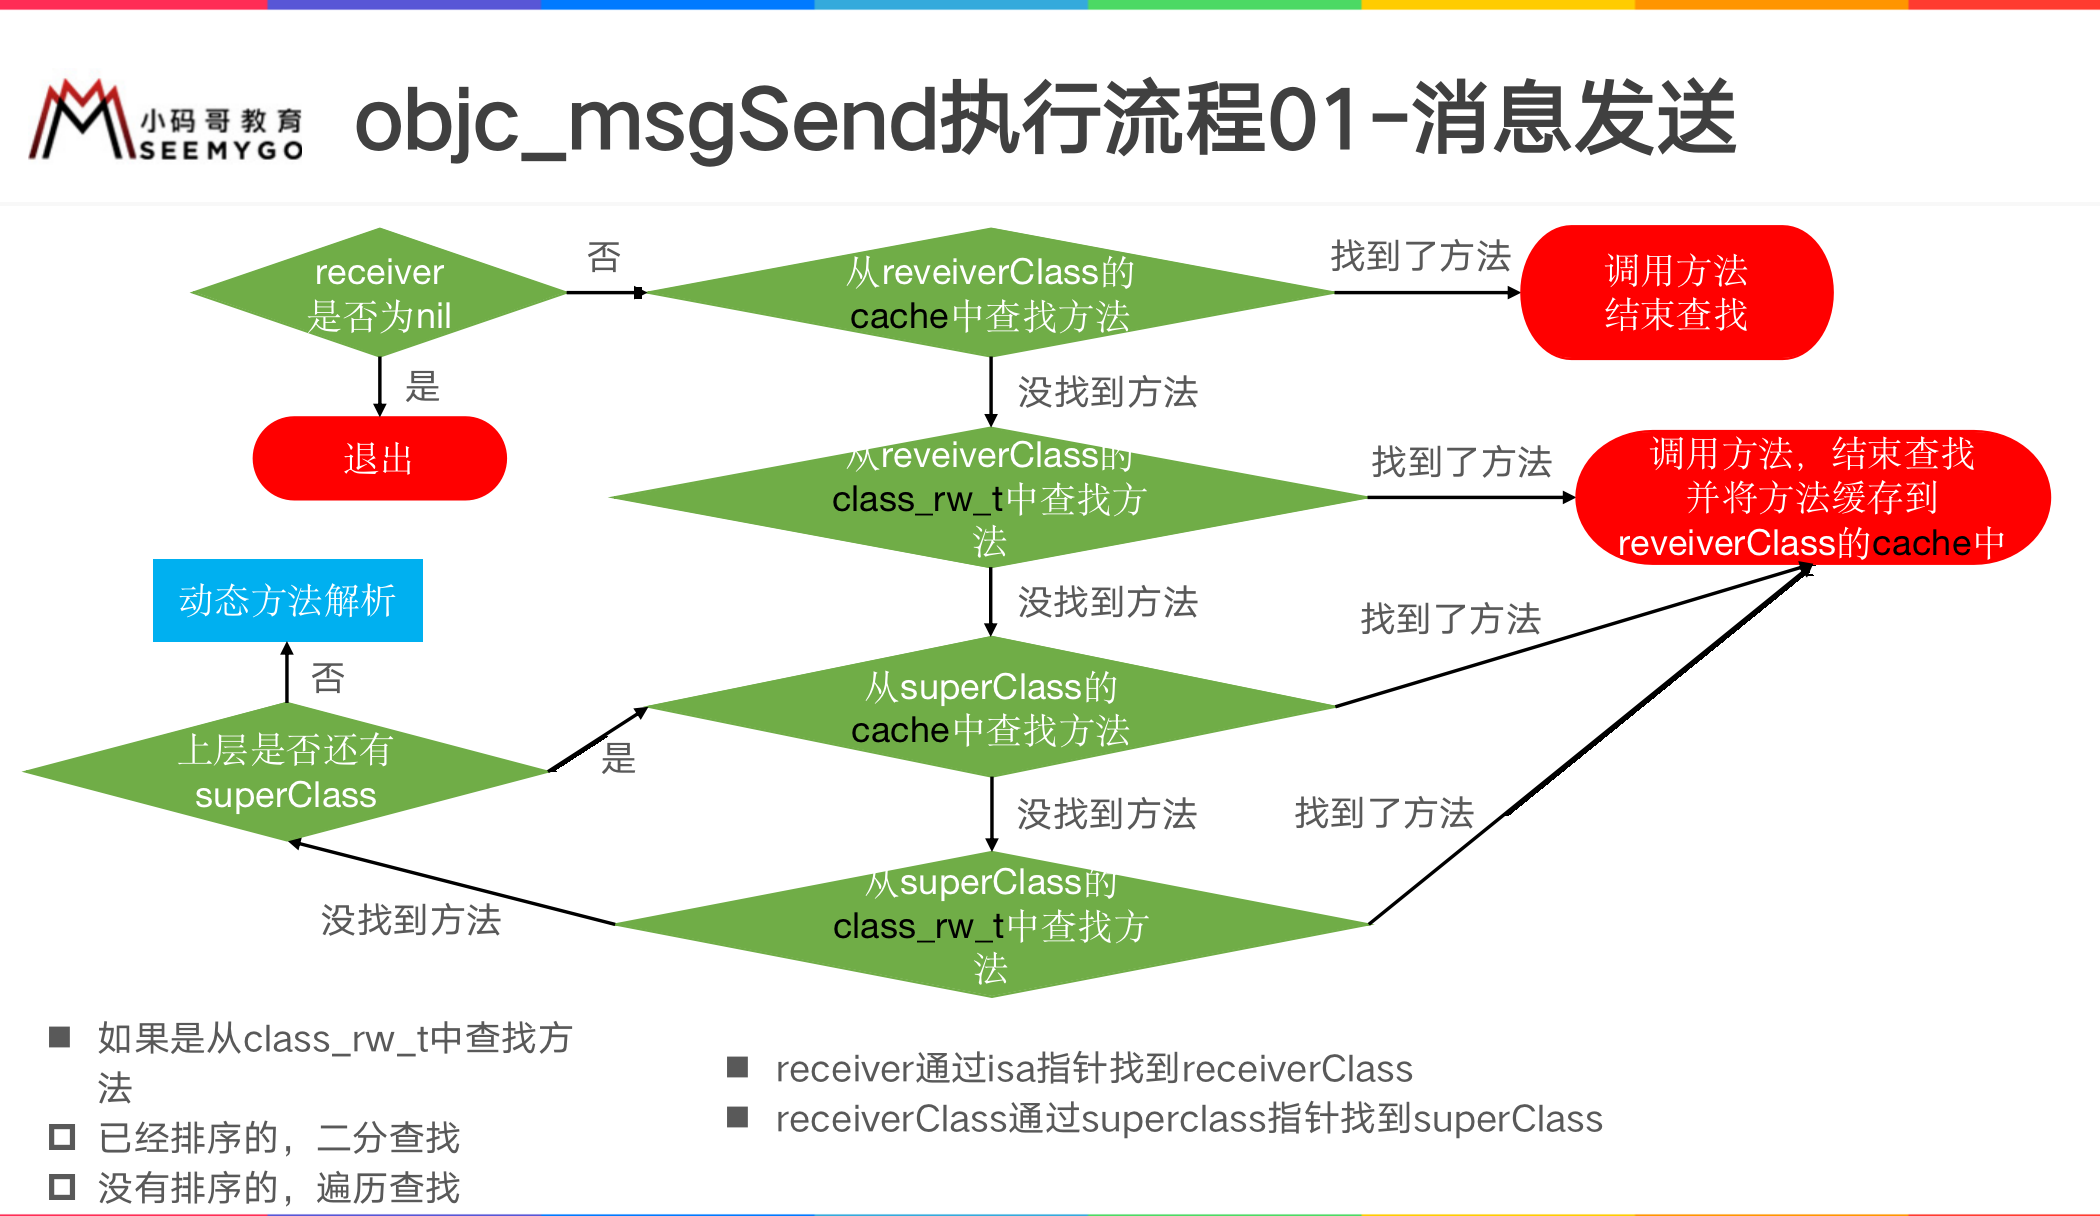
消息发送的流程如下:

  1. receiver 是否为空,如果是退出,否则继续
  2. 从receiver的类对象(如果传入的是类则找的是元类对象,下文统称为receiverClass)的cache中查找方法,如果找到则调用方法,如果找不到则继续
  3. 从receiverClass中的class_rw_t中查找方法,如果找到则调用方法,并将方法插入缓存,如果找不到则继续
  4. superClass的cache中查找方法,有则调用并缓存到当前receiverClass的cache中(不是superClass的cache),否则继续
  5. superClassclass_rw_t中找,有则调用并缓存到receiverClass的cache中,否则继续
  6. 继续通过superClasssuperClass找方法,流程回到4,直到再也没有父类了,并且也找不到方法,那么将会进入动态方法解析阶段。

其中:

  • 如果是从class_rw_t中查找方法,若方法列表已经排序好,那么就使用二分查找法查找
  • 如果是还没排序的方法,那么就使用遍历的方法查找
  • 在缓存中查找方法的过程也称作快速查找(使用汇编实现),在
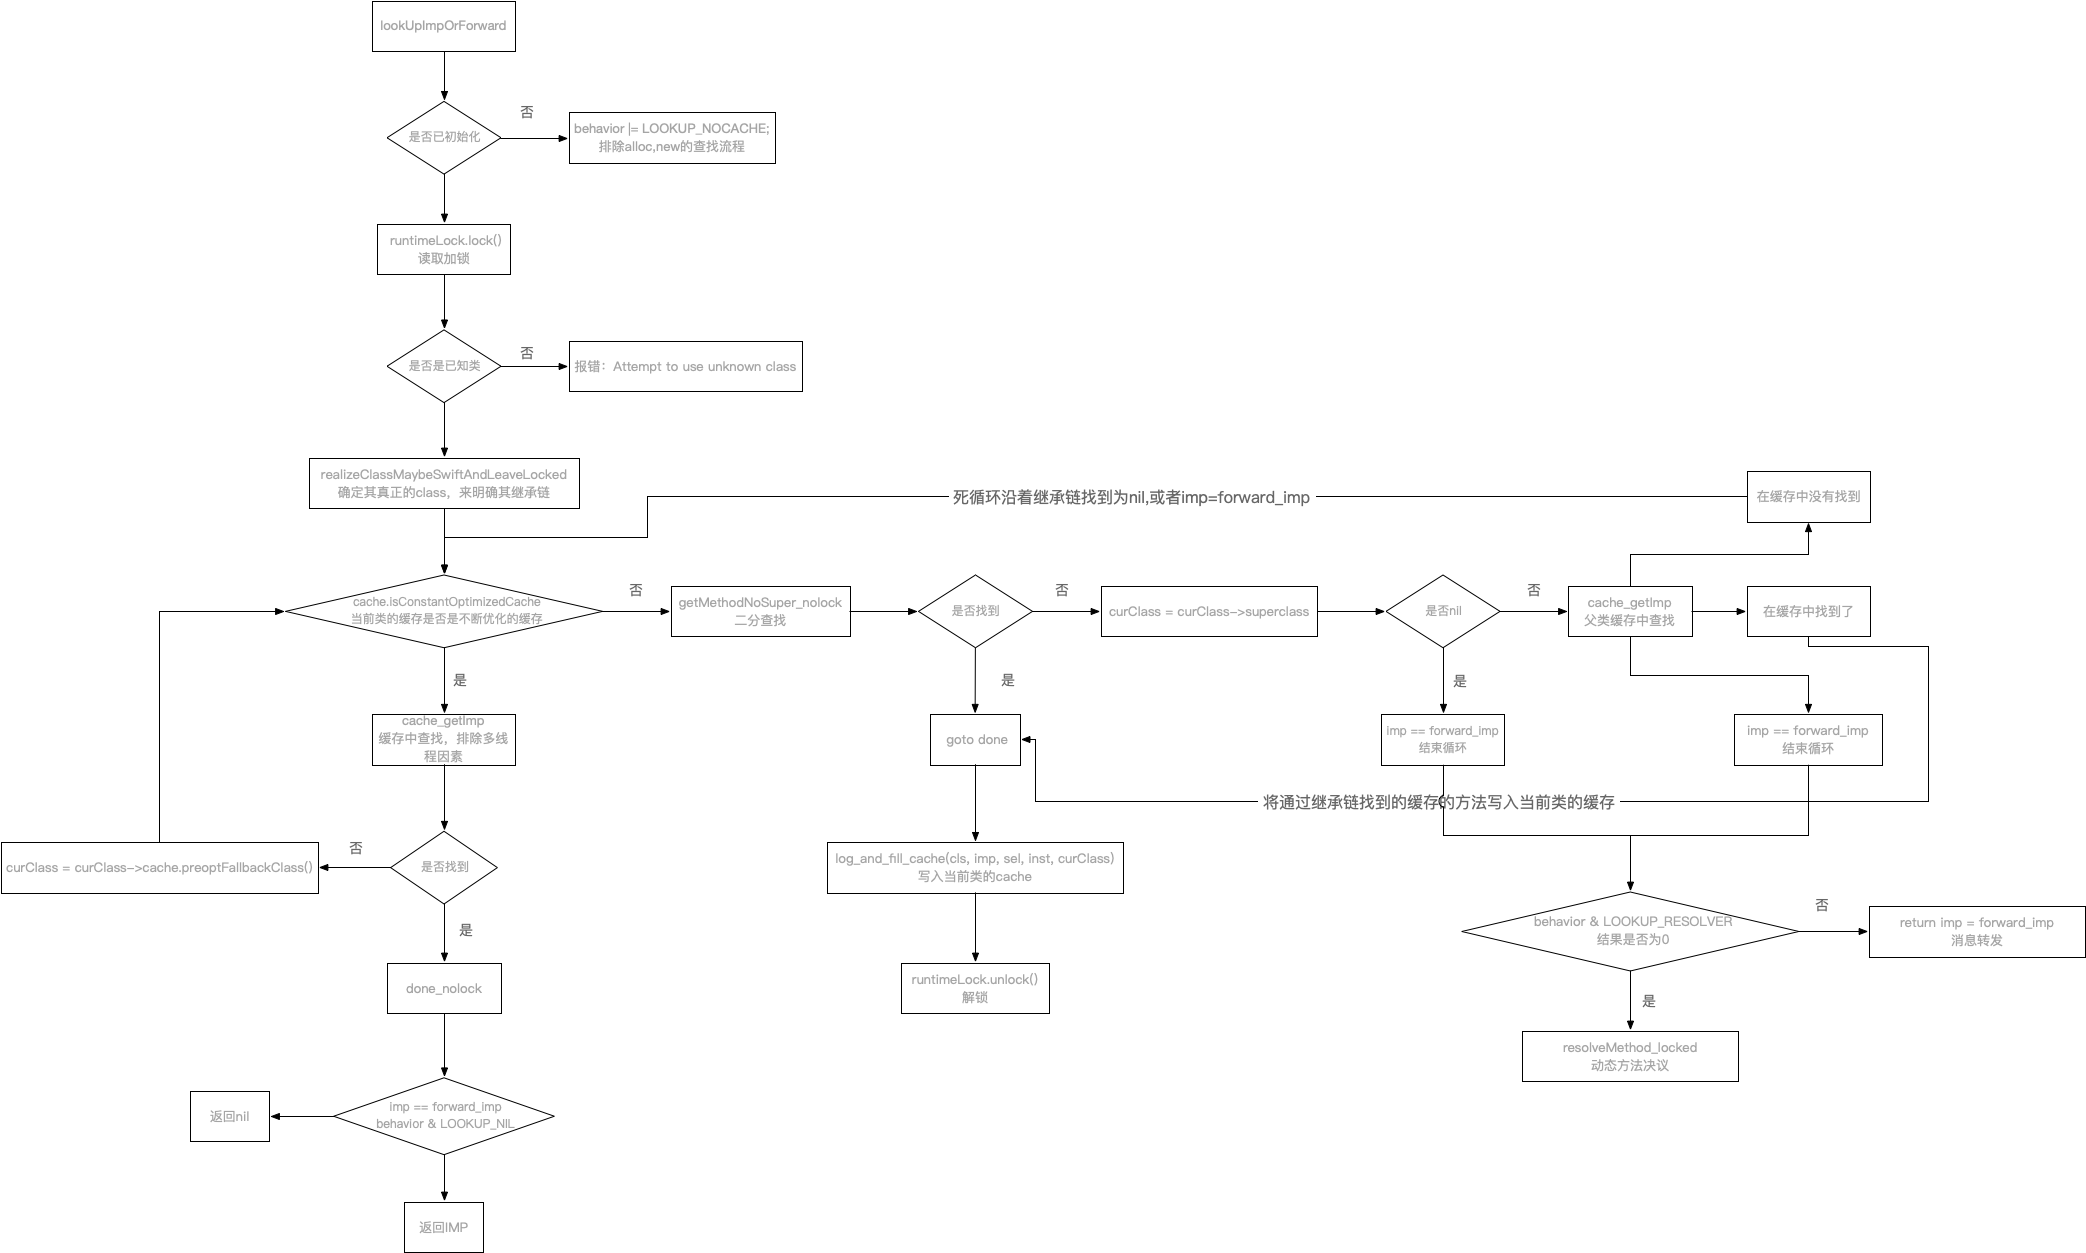
class_rw_t中查找方法的过程也称作慢速查找(使用汇编和C++实现),C++部分方法源码在lookUpImpOrForward函数中,如下:
1
2
3
4
5
6
7
8
9
10
11
12
13
14
15
16
17
18
19
20
21
22
23
24
25
26
27
28
29
30
31
32
33
34
35
36
37
38
39
40
41
42
43
44
45
46
47
48
49
50
51
52
53
54
55
56
57
58
59
IMP lookUpImpOrForward(id inst, SEL sel, Class cls, int behavior)
{
const IMP forward_imp = (IMP)_objc_msgForward_impcache;
IMP imp = nil;
Class curClass;
runtimeLock.assertUnlocked();
// Optimistic cache lookup
if (fastpath(behavior & LOOKUP_CACHE)) {
imp = cache_getImp(cls, sel);
if (imp) goto done_nolock;
}
runtimeLock.lock();
checkIsKnownClass(cls);
if (slowpath(!cls->isRealized())) {
cls = realizeClassMaybeSwiftAndLeaveLocked(cls, runtimeLock);
}
if (slowpath((behavior & LOOKUP_INITIALIZE) && !cls->isInitialized())) {
cls = initializeAndLeaveLocked(cls, inst, runtimeLock);
}
runtimeLock.assertLocked();
curClass = cls;
for (unsigned attempts = unreasonableClassCount();;) {
// curClass method list.
Method meth = getMethodNoSuper_nolock(curClass, sel);
if (meth) {
imp = meth->imp;
goto done;
}
if (slowpath((curClass = curClass->superclass) == nil)) {
imp = forward_imp;
break;
}
if (slowpath(--attempts == 0)) {
_objc_fatal("Memory corruption in class list.");
}

// Superclass cache.
imp = cache_getImp(curClass, sel);
if (slowpath(imp == forward_imp)) {
break;
}
if (fastpath(imp)) {
// Found the method in a superclass. Cache it in this class.
goto done;
}
}
if (slowpath(behavior & LOOKUP_RESOLVER)) {
behavior ^= LOOKUP_RESOLVER;
return resolveMethod_locked(inst, sel, cls, behavior);
}
done:
log_and_fill_cache(cls, imp, sel, inst, curClass);
runtimeLock.unlock();
done_nolock:
if (slowpath((behavior & LOOKUP_NIL) && imp == forward_imp)) {
return nil;
}
return imp;
}

慢速查找流程图:

消息发送流程图:

动态方法解析(也称:动态方法决议)

当消息发送流程找不到方法后就会进入动态方法解析流程。

动态方法解析是当消息发送阶段找不到方法的时候,开发者可以通过重写特定方法(如果是类方法就重写+ (BOOL)resolveClassMethod:(SEL)sel,如果是对象方法就重写+ (BOOL)resolveInstanceMethod:(SEL)sel),给原先不存在的方法添加方法实现。主要是用到runtime里面的class_addMethod函数,并且动态解析后,会重新走”消息发送“的流程

使用

假如这里的person没有实现print方法

1
2
Person *person = [Person new];
[person print];

那我们可以在Person.m添加一个方法实现用来替换丢失的print,这里我们用truePrint来替代

1
2
3
4
5
6
7
8
9
10
11
12
13
14
15
16
17
18
- (void)truePrint {
NSLog(@"true print");
}

+ (BOOL)resolveInstanceMethod:(SEL)sel {
if (sel == @selector(print)) {

// 获取truePrint方法的Method对象
Method truePrint = class_getInstanceMethod(self, @selector(truePrint));

// 动态添加print方法的实现,通过method_getImplementation获取到方法的函数指针,通过method_getTypeEncoding拿到方法的函数编码即 v@: 或 v16@0:8
class_addMethod(self, sel, method_getImplementation(truePrint), method_getTypeEncoding(truePrint));

// 返回YES代表有动态添加方法
return YES;
}
return [super resolveInstanceMethod:sel];
}

Method的结构

点击Method我们可以看到结构如下

1
typedef struct objc_method *Method;

ojbc_method的定义如下

1
2
3
4
5
struct objc_method {
SEL _Nonnull method_name;
char * _Nullable method_types;
IMP _Nonnull method_imp;
}

可以看到跟上面所说的method_t是类似的东西

以下是一些拿到Method对象后可以使用的一些函数

1
2
3
4
5
6
7
8
9
10
11
12
13
14
15
16
17
18
19
20
21
22
23
24
25
26
// 函数调用,但是不接收返回值类型为结构体
method_invoke
// 函数调用,但是接收返回值类型为结构体
method_invoke_stret
// 获取函数名
method_getName
// 获取函数实现IMP
method_getImplementation
// 获取函数type encoding
method_getTypeEncoding
// 复制返回值类型
method_copyReturnType
// 复制参数类型
method_copyArgumentType
// 获取返回值类型
method_getReturnType
// 获取参数个数
method_getNumberOfArguments
// 获取函数参数类型
method_getArgumentType
// 获取函数描述
method_getDescription
// 设置函数实现IMP
method_setImplementation
// 交换函数的实现IMP
method_exchangeImplementations

Runtime中的原理

在上面的消息发送的流程函数lookUpImpOrForward中,有一段代码如下

1
2
3
4
if (slowpath(behavior & LOOKUP_RESOLVER)) {
behavior ^= LOOKUP_RESOLVER;
return resolveMethod_locked(inst, sel, cls, behavior);
}

当找不到消息的时候就会进入动态方法解析的流程即resolveMethod_locked,如下

1
2
3
4
5
6
7
8
9
10
11
12
13
14
15
16
17
18
19
20
static NEVER_INLINE IMP resolveMethod_locked(id inst, SEL sel, Class cls, int behavior) {
runtimeLock.assertLocked();
ASSERT(cls->isRealized());

runtimeLock.unlock();

if (! cls->isMetaClass()) {
// try [cls resolveInstanceMethod:sel]
resolveInstanceMethod(inst, sel, cls);
} else {
// try [nonMetaClass resolveClassMethod:sel]
// and [cls resolveInstanceMethod:sel]
resolveClassMethod(inst, sel, cls);
if (!lookUpImpOrNilTryCache(inst, sel, cls)) {
resolveInstanceMethod(inst, sel, cls);
}
}

return lookUpImpOrForwardTryCache(inst, sel, cls, behavior);
}

这里面我们可以发现resolveInstanceMethodresolveClassMethod两个函数,分别是实现实例方法的动态消息解析和类方法的动态消息解析,这两个长得差不多,所以我们拿实例对象的函数查看一下

1
2
3
4
5
6
7
8
9
10
11
12
13
14
15
16
17
18
19
20
21
22
23
24
25
26
27
28
29
30
31
32
33
34
35
static void resolveInstanceMethod(id inst, SEL sel, Class cls)
{
runtimeLock.assertUnlocked();
ASSERT(cls->isRealized());
SEL resolve_sel = @selector(resolveInstanceMethod:);

if (!lookUpImpOrNilTryCache(cls, resolve_sel, cls->ISA(/*authenticated*/true))) {
// Resolver not implemented.
return;
}

BOOL (*msg)(Class, SEL, SEL) = (typeof(msg))objc_msgSend;
bool resolved = msg(cls, resolve_sel, sel);

// Cache the result (good or bad) so the resolver doesn't fire next time.
// +resolveInstanceMethod adds to self a.k.a. cls
IMP imp = lookUpImpOrNilTryCache(inst, sel, cls);

if (resolved && PrintResolving) {
if (imp) {
_objc_inform("RESOLVE: method %c[%s %s] "
"dynamically resolved to %p",
cls->isMetaClass() ? '+' : '-',
cls->nameForLogging(), sel_getName(sel), imp);
}
else {
// Method resolver didn't add anything?
_objc_inform("RESOLVE: +[%s resolveInstanceMethod:%s] returned YES"
", but no new implementation of %c[%s %s] was found",
cls->nameForLogging(), sel_getName(sel),
cls->isMetaClass() ? '+' : '-',
cls->nameForLogging(), sel_getName(sel));
}
}
}

在这里我们可以看到对resolveInstanceMethod方法进行了一次objc_msgSend调用,调用之后又执行了lookUpImpOrNilTryCache函数进行了缓存,如果缓存成功,那么下次调用这个方法就不会在进入动态方法解析阶段,直接通过消息发送阶段就调用成功了。

优化

根据我们以前所学的知识可以知道,方法查找的流程为

实例方法:类 – 父类 – 父类 – … – 根类 – nil

类方法:元类 – 父元类 – 父元类 – … – 根元类 – 根类 – nil

也就是说丢失的方法最后都会回到根类去找方法,一般情况下是NSObject

通过这个特性,我们可以直接在NSObject上添加分类,然后实现动态解析方法,根据方法名前缀进行判断,然后统一处理未被找到的方法添加默认实现。通过这种方式我们可以减少一些找不到方法导致的崩溃问题,提升用户体验。

消息转发

如果没有实现动态方法解析,那么将进入消息转发阶段。消息转发即把消息交给别人发送的意思。

从上面的lookUpImpOrForward函数的源码我们可以看到,最后是调用了_objc_msgForward_impcache这个函数,这个函数是通过汇编实现的

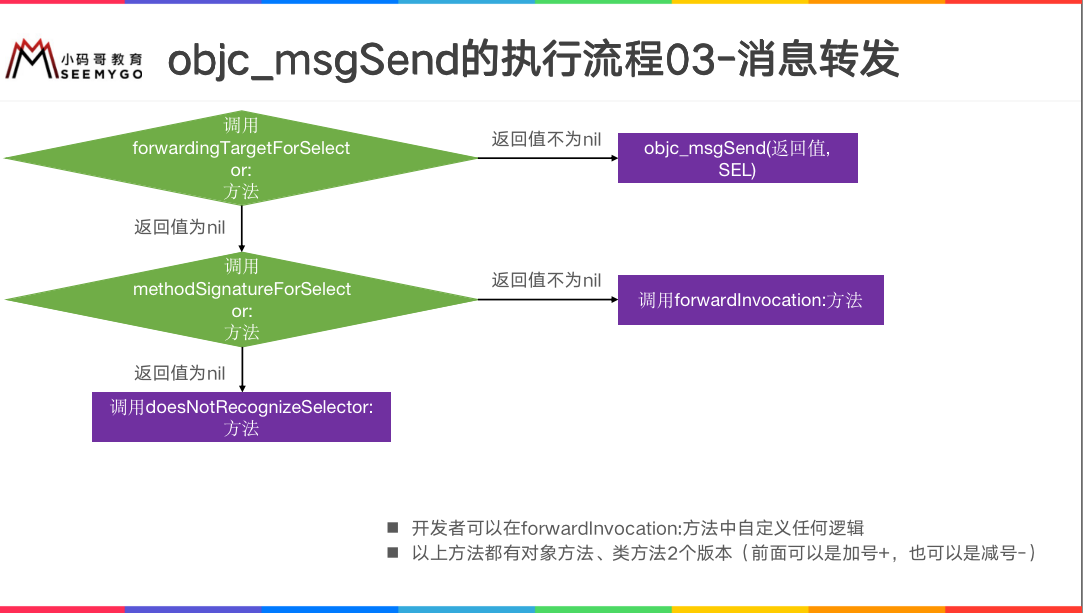
要实现消息转发,我们有两种方式,一种是实现一个方法-forwardingTargetForSelector,一种是实现-methodSignatureForSelector-forwardInvocation,比如

1
2
3
4
5
6
- (id)forwardingTargetForSelector:(SEL)aSelector {
if (aSelector == @selector(print)) {
return [[Student alloc] init];
}
return [super forwardingTargetForSelector:aSelector];
}

实现了这个方法之后,最后系统会去我们提供的Student对象去寻找print方法,找到了的话就会进行调用。注意这个方法每次都会进来,每次都会生成新的Student对象对其print方法进行调用。

如果forwardingTargetForSelector没实现或者返回空的话

1
2
3
4
5
6
- (id)forwardingTargetForSelector:(SEL)aSelector {
if (aSelector == @selector(print)) {
return nil;
}
return [super forwardingTargetForSelector:aSelector];
}

那么就会寻找-methodSignatureForSelector-forwardInvocation

1
2
3
4
5
6
7
8
9
10
11
12
13
14
15
/// 方法签名: 返回值类型、参数类型
- (NSMethodSignature *)methodSignatureForSelector:(SEL)aSelector {
if (aSelector == @selector(print)) {
return [NSMethodSignature signatureWithObjCTypes:"v16@0:8"];
}
return [super methodSignatureForSelector:aSelector];
}

/// NSInvocation封装了一个方法调用,包括:方法调用者、方法名、方法参数
/// anInvocation.target 方法调用者
/// anInvocation.selector 方法名
//// [anInvocation getArgument:NULL atIndex:0] 方法参数
- (void)forwardInvocation:(NSInvocation *)anInvocation {
[anInvocation invokeWithTarget:[[Student alloc] init]];
}

首先我们在方法签名中指定方法类型,然后在forwardInvocation方法中,修改target,然后直接调用,这样子就会直接调用Student的print方法了

NSInvocation

当系统执行到forwardInvocation的时候,无论在方法内有任何实现,都不会执行到doseNotRecognizeSelector(抛出异常),所以实现了就不会崩,即便什么都不做。

forwardInvocation内我们可以拿到方法调用的很多信息,比如方法调用者anInvocation.target、方法名anInvocation.selector和方法参数

比如调用方法为[person print:1],进入到forwardInvocation后我们可以通过以下方法拿到1这个参数

1
2
3
4
- (void)forwardInvocation:(NSInvocation *)anInvocation {
int a;
[anInvocation getArgument:&a atIndex:2]; // 第一个参数是self,第二个是_cmd,所以从下标2开始取
}

如果要拿返回值的话,就可以这么做

1
2
3
4
5
6
- (void)forwardInvocation:(NSInvocation *)anInvocation {
[anInvocation invokeWithTarget:[[Student alloc] init]]; // 要先调用一下Student的print方法,这里假设返回值是整型
int result;
[anInvocation getReturnValue:&result];
NSLog(@"%d",result); /// 这里可以拿到返回值
}

NSMethodSignature

[NSMethodSignature signatureWithObjCTypes:"v16@0:8"],注意这里的方法编码要跟下面forwardInvocation要调用的方法的方法编码一致

我们除了可以通过方法编码拿到NSMethodSignature对象之外,还可以这么做

1
2
3
4
5
6
- (NSMethodSignature *)methodSignatureForSelector:(SEL)aSelector {
if (aSelector == @selector(print)) {
return [[Student new] methodSignatureForSelector:@selector(print)];
}
return [super methodSignatureForSelector:aSelector];
}

类方法的消息转发

+ (id)forwardingTargetForSelector:(SEL)aSelector

+ (NSMethodSignature *)methodSignatureForSelector:(SEL)aSelector

+ (void)forwardInvocation:(NSInvocation *)anInvocation

这几个方法也有类方法版本,但是代码补全没出来,但是实际使用是可行的

+ (id)forwardingTargetForSelector:(SEL)aSelector在这个方法里面返回的消息接受者既可以是类对象也可以是实例对象。

@synthesize 和 @dynamic

@synthesize用来自动给成员变量名生成settergetter的声明和实现

@dynamic用来告诉编译器不要自动生成settergetter的实现(声明还是会声明的),待到运行时开发者自己实现,并且不会为属性实现带下划线的成员变量

super

假如我们调用Student实例的一个父类方法

[super run:xx]

那么编译后会变成如下代码

objc_msgSendSuper(self,class_getSuperclass(objc_getClass("Student")),sel_registerName("run"),xx);

所以super发送消息的本质是调用objc_msgSendSuper2函数,最终的消息接受者依旧是self,只是实例方法寻找从父类的类对象开始寻找,类方法从父类的元类对象开始寻找。

所以当我们调用方法[super class]的时候,跟[self class]没区别,返回结果是一致的